SPWFM Disaster Recovery
This procedure can also be used to move SharePoint Workflow Manager (SPWFM) databases to a new SQL server, or even to upgrade from “Classic WFM” to SPWFM.
Update 7/6/23: I was able to get this content published as “Official Microsoft Documentation”. See SharePoint Workflow Manager Farm Restore and Disaster Recovery.
Update 5/16/23: I found that we can simply generate a new PrimarySymmetricKey value, so we aren’t really dependent on any values from the previous workflow farm. If we have the 4 required Service Bus and Workflow databases, we can restore the workflow farm.
Overview
Use the steps here to move your SharePoint Workflow Manager (SPWFM) databases to a new SQL Server instance. This may be done as part of a disaster recovery (DR) effort, or if you just have to restore the SPWFM databases with different names.
These steps could also be used as an alternative method for migrating from WFM to SPWFM on new hardware. However, it’s a bit more complex than the recommended procedure, detailed in Upgrading SharePoint and WFM at the Same Time. If you choose to use this "farm restore" procedure to upgrade / migrate, keep in mind that the content databases and App Management service app and database also need to be upgraded along the way to keep your existing workflows intact.
Note: The Workflow Configuration Wizard only prompts you for the database connection information and names of the Service Bus Management database and the Workflow Management database. The connection information for the other four Service Bus and Workflow databases are stored within those two management databases. Since that connection information is not updated by the wizard, you can’t use the wizard to change SQL servers or database names. In that case, you must use the following steps to restore the workflow farm.
Scenario 1: Using a SQL alias
If you are open to using a SQL alias, then moving SPWFM databases to a new SQL server is easy.
- Stop all SharePoint Workflow Manager services on all SPWFM servers, or if possible, shut down the servers to drop existing connections to the Workflow (WF) and Service Bus (SB) databases. SPWFM related services include:
- Service Bus Gateway
- Service Bus Message Broker
- Service Bus Resource Provider
- Service Bus VSS
- Service Fabric Host Service
- Workflow Manager Backend
- World Wide Web Publishing Service
- Move the WF and SB databases physically from the original SQL Server instance to the target SQL Server instance. Database backup and restore works well for that.
Note: Keep in mind that you need to keep the same database names for the 6 Service Bus and Workflow databases during the move. If you need to change database names, then you’ll have to use Scenario 2.
-
Using cliconfg.exe, create a SQL alias to point the "old" SQL server name at the new SQL server. Do this on all of the SPWFM servers. Details around creating a SQL alias can be found here.
-
Restart your SharePoint Workflow Manager servers / services.
Since we are using a SQL alias to map the "old" SQL server name to the "new" SQL server, SPWFM is unaware that anything has changed. The services should come up and connect to the databases on the new SQL server.
Scenario 2: Without using a SQL alias (Farm Restore)
If for some reason you cannot use a SQL alias, or if you need to change the names of the 6 Service Bus and Workflow databases, then you’ll have to do a Workflow farm restore. This process, while not too complicated, has many potential failure points. As such, it is strongly encouraged to use a SQL alias and keep your database names the same, as described above in Scenario 1.
Move the WFM and Service Bus databases
- Using this procedure we only need 4 out of the 6 WFM / SB databases. We do NOT need the WFManagementDB and SbManagementDB databases. Those will be created new as part of this procedure.
- Backup the 4 databases you need on the "old" SQL server and restore to your "new" SQL server. In the example below, the default database names are used.
- SbGatewayDatabase
- SBMessageContainer01
- WFInstanceManagementDB
- WFResourceManagementDB
Restore the Workflow Farm
If you have multiple SPWFM servers, choose one to run the restore on. We will refer to that as "the SPWFM server" going forward.
On the SPWFM server, we need to run through some PowerShell to restore everything using the restored databases. It is advised to run through this one step at a time and not just run everything as a single script. That way if one step fails, you can troubleshoot without it going on to the next step and potentially making a mess.
Important! You are setting a new "Certificate Generation Key" in the restored farm. You will want to store this value somewhere, as it is required any time you rejoin the farm, or join additional servers to the farm.
Run PowerShell ISE as Administrator on the SPWFM server, and proceed through the following steps:
Set the variables
These are the variables that the rest of the commands will use. After setting these appropriately for your environment, you shouldn’t have to make any changes within any of the subsequent commands.
$wfmAcc = "CONTOSO\spfarm" # Account in services.msc used to run the SPWFM services
$newPass = "YourPWDHere" # Set the password of the SPWFM service account defined variable $wfmAcc
$certGenKeyPlain = "YourCertGenKeyHere" # A new Certificate Generation Key of your choosing
$manageUsers = @("spfarm@contoso.local","sysadm@contoso.local") # Admin accounts...
#... Use UPN form (user@domain). This should include the account that is running this script.
$adminGroup = "BUILTIN\Administrators" # The group that will have admin permissions for the...
#... SPWFM farm.  The local administrators group is common.
$newSQL = "sql" # Set the SQL instance name of the target SQL server
$sbGatewayDB = "SbGatewayDatabase" # Restored Service Bus Gateway DB name
$sbMessageDB = "SBMessageContainer01" # Restored Service Bus Message Container DB name
$sbManageDB = "SbManagementDB" # Name for the NEW Service Bus Management DB that will be created
$wfInstanceDB = "WFInstanceManagementDB" #  Restored Workflow Instance Management DB
$wfResourceDB = "WFResourceManagementDB" # Restored Workflow Resource Management DB
$wfManageDB = "WFManagementDB" # Name for the NEW Workflow Management DB DB that will be created
$logPath = "C:\temp\wfm-restore.log.txt" # A log file used for recording information during the restore

### Shouldn't need to change anything below this line ###
# Set a few more variables automatically
$PrimarySymmetricKey = [Convert]::ToBase64String((1..32|%{[byte](Get-Random -Max 256)}))
$certGenKey = convertto-securestring $certGenKeyPlain -asplaintext -force
$myPassword = convertto-securestring $newPass -asplaintext -force
$restoreTime = Get-Date
Restore the Service Bus farm
# Restore the Service Bus farm
# You'll get a warning about the Farm Encryption Token, but don't worry, we'll fix that in a later step
Restore-SBFarm -RunAsAccount $wfmAcc -GatewayDBConnectionString "Data Source=$newSQL;Initial Catalog=$sbGatewayDB;Integrated Security=True;Encrypt=False" -SBFarmDBConnectionString "Data Source=$newSQL;Initial Catalog=$sbManageDB;Integrated Security=True;Encrypt=False" -AdminGroup $adminGroup -CertificateAutoGenerationKey $certGenKey -Verbose
Note: You’ll get a warning about the "Farm Encryption Token", but don’t worry, we’ll fix that in a later step.
Restore the Service Bus Message Container
# Restore the Service Bus Message Container
Restore-SBMessageContainer -ContainerDBConnectionString "Data Source=$newSQL;Initial Catalog=$sbMessageDB;Integrated Security=True;Encrypt=False" -SBFarmDBConnectionString "Data Source=$newSQL;Initial Catalog=$sbManageDB;Integrated Security=True;Encrypt=False" -Id 1 -Verbose
Restore the Service Bus Gateway
# Restore the Service Bus Gateway
Restore-SBGateway -GatewayDBConnectionString "Data Source=$newSQL;Initial Catalog=$sbGatewayDB;Integrated Security=True;Encrypt=False" -SBFarmDBConnectionString "Data Source=$newSQL;Initial Catalog=$sbManageDB;Integrated Security=True;Encrypt=False" -Verbose
Upgrade the Service Bus Farm
# Upgrade the SB farm
Invoke-SBFarmUpgrade -SBFarmDBConnectionString "Data Source=$newSQL;Initial Catalog=$sbManageDB;Integrated Security=True;Encrypt=False" -CertificateAutoGenerationKey $certGenKey -Verbose
Add the local SPWFM server to the Service Bus
# Add the local SPWFM server to the Service Bus
Add-SBHost -EnableFirewallRules $TRUE -RunAsPassword $myPassword -CertificateAutoGenerationKey $certGenKey -SBFarmDBConnectionString "Data Source=$newSQL;Initial Catalog=$sbManageDB;Integrated Security=True;Encrypt=False" -Verbose
Set the Service Bus namespace
# Set the Service Bus namespace
Set-SBNamespace -Name "WorkflowDefaultNamespace" -PrimarySymmetricKey $PrimarySymmetricKey -ManageUsers $manageUsers -Verbose
Verify the Service Bus is happy
# At this point, all SB services should be running
# and we should have a namespace of "WorkflowDefaultNamespace" defined
# If not, you'll want to fix that before moving on.
Get-SBFarm
Get-SBFarmStatus
Get-SBNamespace
Restore the Workflow Manager Services Farm
# Restore the Workflow Manager Services Farm
Restore-WFFarm -RunAsAccount $wfmAcc -InstanceDBConnectionString "Data Source=$newSQL;Initial Catalog=$wfInstanceDB;Integrated Security=True;Asynchronous Processing=True;Encrypt=False" -ResourceDBConnectionString "Data Source=$newSQL;Initial Catalog=$wfResourceDB;Integrated Security=True;Asynchronous Processing=True;Encrypt=False" -WFFarmDBConnectionString "Data Source=$newSQL;Initial Catalog=$wfManageDB;Integrated Security=True;Encrypt=False" -InstanceStateSyncTime $restoreTime -ConsistencyVerifierLogPath $logPath -CertificateAutoGenerationKey $certGenKey -Verbose
Add the local SPWFM server to the SPWFM farm
# Add the local SPWFM server to the SPWFM farm
$SBClientConfiguration = Get-SBClientConfiguration -Namespaces "WorkflowDefaultNamespace"
Add-WFHost -WFFarmDBConnectionString "Data Source=$newSQL;Initial Catalog=$wfManageDB;Integrated Security=True;Encrypt=False" -RunAsPassword $myPassword -EnableFirewallRules $TRUE -CertificateAutoGenerationKey $certGenKey -SBClientConfiguration $SBClientConfiguration –Verbose
Upgrade the SPWFM farm
# Upgrade the SPWFM host
Invoke-WFHostUpgrade -Verbose
Alternatively, you can run the Workflow Manager Configuration Wizard and choose "Upgrade Workflow Manager Farm". It does the same thing.
Check Status
After upgrade, give it a minute or two to start services, then check status by running this PowerShell:
Get-WFFarm; Get-WFFarmStatus; Get-SBFarm; Get-SBFarmStatus
It should show that all the services are running and the farm is in a happy state.
Join other servers to workflow farm
At this point, if everything looks good, if you had additional servers in the SPWFM farm, you should be able to add them back by running the Workflow Manager Configuration wizard and choosing to join an existing farm.
Keep in mind that the "Certificate Generation Key" was set in the script above, so you’ll have to use that when joining the farm.
Validate on the SharePoint side
Trust the SPWFM SSL certificate on the SharePoint servers
Because SharePoint must contact the SPWFM service endpoint, the SharePoint servers must trust the certificate it’s using.
-
Complete the steps here: Install Workflow Manager certificates in SharePoint Server.
-
Refresh the SPTrustedSecurityTokenIssuer by running the RefreshMetadataFeed timer job on any SharePoint server.
 $tj = Get-SPTimerJob | ? {$_.name -match "RefreshMetadataFeed"}
 Start-SPTimerJob $tj
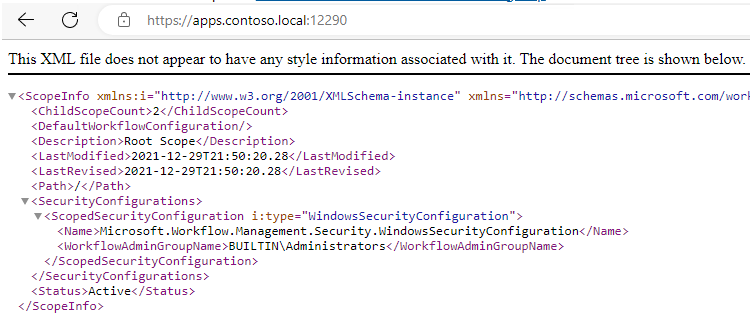
Validate the SPWFM endpoint
On one of the SharePoint servers, log in as either the SPWFM RunAs account, or a user that is a member of AdminGroup, as defined in the restore script above. Browse to the FQDN of the SPWFM endpoint. For example: https://apps.contoso.local:12290/. The result should look like this:
Optional Steps
Register the SharePoint farm
If you used these steps to simply move the Workflow and Service Bus databases to a new SQL server, then the SharePoint farm is already registered and you should not complete this step.
However, if you used these steps to migrate your Workflow and Service Bus databases to a new SPWFM farm, for example, as part of a SharePoint farm upgrade / migration, then you will need to run the Register-SPWorkflowService command. Example:
$Scope = "SharePoint2013" # Use the Scope Name you were using previously
$site = "https://team1.contoso.local/" # Any site in the SharePoint web app
$wfURI = "https://spwfm.contoso.local:12290" # Get this value by running "Get-WFFarm on the SPWFM server
Register-SPWorkflowService -SPSite $site -WorkflowHostUri $wfURI -ScopeName $Scope -Force
If you are unsure of the registration status, you can always use the Clean up and Re-register steps.
Publish a New Workflow
If you used this procedure to upgrade / migrate, and if your SharePoint web application URLs have changed as part of this migration (for example from http://sp2013.contoso.local to https://spse.contoso.local), workflows that were created prior to the workflow migration / farm restore will not work at first. You will need to publish a new workflow first.
Failure to do so will result in a "The remote name could not be resolved" error when running SharePoint 2013-platform workflows. This is documented (albeit vaguely) as issue number 1 here.
Logon to a client machine, open SharePoint Designer, open one of your sites and go to Workflows. Create a new workflow and make sure you can see the “SharePoint Workflow 2013” in the list of platforms to choose from. Create a simple "log to history" 2013-platform workflow and test to make sure it’s successful.