Configure OIDC Authentication for multiple SharePoint web applications
Including info on the mysterious ScopedClientIdentifier property in SharePoint Server Subscription Edition (SPSE).
Overview
To configure multiple web applications in a single farm to use OIDC authentication with Entra ID, you have two options:
- Use a single Entra ID app registration for all web apps.
- Use separate Entra ID app registrations for each web app.
In the examples that follow, the steps from public article Set up OIDC authentication in SharePoint Server with Microsoft Entra ID were used to set up OIDC authentication for SPSE web app https://oidc.contoso.com. Now we’ll configure a second web app https://teams.contoso.com with OIDC authentication.
Using a single Entra ID App Registration
Pros:
- Easier to configure
Cons:
- All web apps are subject to the same login experience. — This may be a “pro” or “con”, depending on your perspective.
- Synching with OneDrive using OIDC authentication will not work for more than one web application. — Since the “Expose an API” page for the Entra ID App Registration can only take a single URI and does not accept wildcards, there does not seem to be a way to configure a single Entra ID App Registration to support OneDrive sync over multiple SharePoint web applications.
Entra ID Configuration
- Browse to the Entra ID Portal.
- Navigate to App Registrations and choose the app registration you originally created to enable OIDC auth for your SharePoint farm.
- Click Authentication and under “Redirect URIs”, click “Add URI”.
Note: In this example, I already had it configured for oidc.contoso.com, and am now adding support for my teams.contoso.com web app.
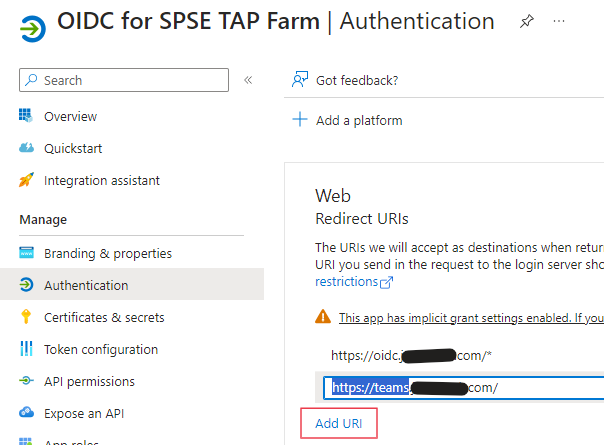
- Hit the Save button on that page.
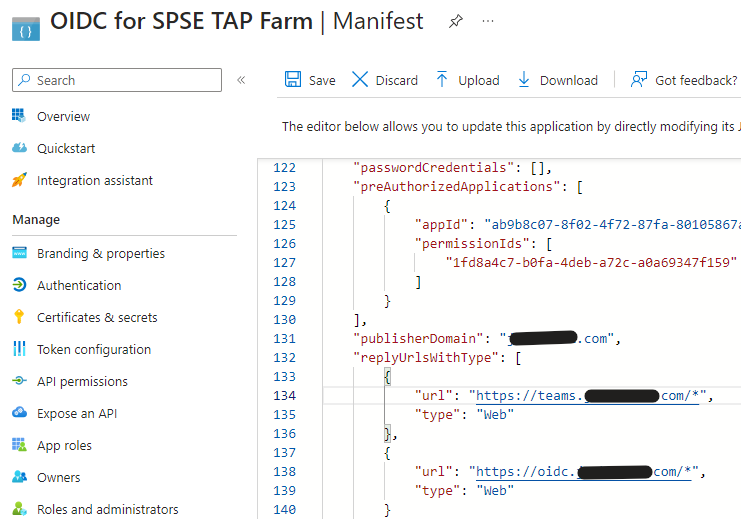
- Click on “Manifest”. Find the “replyUrlsWithType” section. It should already contain the web app URI you added. Add an asterisk
*to the end of the URI and hit Save.
SharePoint Server Configuration
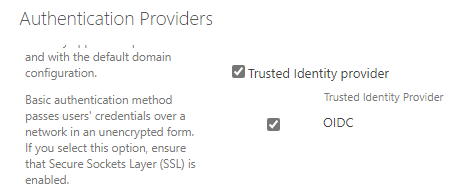
- Configure the Authentication Providers for the second web app to use the Trusted Provider.
-
Give permission to your sites in the second web app for your ODIC / trusted provider users.
-
Access the second web app using OIDC authentication.
Using separate Entra ID App Registrations
Pros:
- Can configure different login experiences within Entra ID for each web app.
- This may be the only way to synchronize multiple web applications using OneDrive and OIDC authentication.
Cons:
- Slightly more difficult to configure.
- Requires SPSE July 2024 build or higher.
Entra ID Configuration
You must create a separate App Registration within Entra ID for the second web application.
You can follow steps 1-11 here: Step 1: Setup identity provider to add a second Entra ID App Registration for your second SharePoint web app.
Note: These are the same steps you completed when setting up the first web app for OIDC. You will probably want to configure it the same way regarding the claims being passed, etc. This App Registration will have a different Client ID, which we’ll add to the existing SharePoint Trusted Provider (SPTrustedIdentityTokenIssuer) in a later step.
SharePoint Server Configuration
-
Patch to July 2024 Public Update (16.0.17328.20424) or a higher build for SharePoint Server Subscription Edition.
-
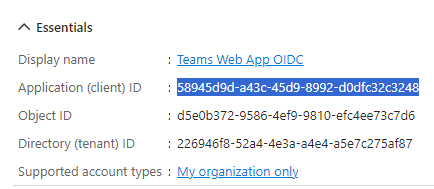
Get your Application (client) ID from the “Overview” page for the new App Registration you created for the second web app in the Entra ID portal.
- Use PowerShell to add the web application URI and Client ID to the “ScopedClientIdentifier” property of your existing Trusted Provider.
# Add another URI and Client ID pair to the Trusted Provider:
$SCI = new-object System.Collections.Generic.Dictionary[[uri]`,[string]]
$SCI.Add("https://theSecondWebApp.contoso.com", "EntraIDAppRegistrationClientID")
Set-SPTrustedIdentityTokenIssuer -Identity YourTrustedProviderName -ScopedClientIdentifier $SCI -IsOpenIDConnect
Example:
# Add another URI and Client ID pair to the Trusted Provider:
$SCI = new-object System.Collections.Generic.Dictionary[[uri]`,[string]]
$SCI.Add("https://teams.contoso.com", "58945d9d-a43c-45d9-8992-d0dfc32c3248")
Set-SPTrustedIdentityTokenIssuer -Identity OIDC -ScopedClientIdentifier $SCI -IsOpenIDConnect
- If you haven’t already, configure the Authentication Providers for the second web app to use the Trusted Provider.
-
Give permission to your sites in the second web app for your ODIC / trusted provider users.
-
Access the second web app using OIDC authentication. In this scenario, authentication will flow through the separate app registration on the Entra ID side, but still use the single existing trusted provider on the SharePoint side.
Examples working with ScopedClientIdentifier
Note: If needed, you can remove items from the ScopedClientIdentifier property, either individually using the URI, or you can clear out the entire property.
# Check value of ScopedClientIdentifier
$Trust = Get-SPTrustedIdentityTokenIssuer -Identity "OIDC"
$Trust | select DefaultClientIdentifier, ScopedClientIdentifier | fl
# Remove just one specific entry from ScopedClientIdentifier
$Trust = Get-SPTrustedIdentityTokenIssuer -Identity "OIDC"
$Trust.ScopedClientIdentifier.Remove("https://teams.contoso.com")
$Trust.update()
# Clear out ScopedClientIdentifier
$Trust = Get-SPTrustedIdentityTokenIssuer -Identity "OIDC"
$Trust.ScopedClientIdentifier.Clear()
$Trust.update()