SharePoint Server March 2025 update problem: BDC fails with error: The certificate chain was issued by an authority that is not trusted
Problem
After upgrading an existing SharePoint Server Subscription Edition (SPSE) farm to the March 2025 update (aka: 25H1), all SQL Server-based Business Data Connectivity (BDC) / Business Connectivity Service (BCS) applications like External Content Types, External Lists, and External Columns may fail with the following error:
Cannot connect to the LobSystem (External System). Reason: 'A connection was successfully established with the server, but then an error occurred during the login process. (provider: SSL Provider, error: 0 - The certificate chain was issued by an authority that is not trusted.)'

Notes:
- This problem also exists in the April 2025 update, and may continue to exist in future builds as well.
- This problem only occurs if the SQL server that hosts the external database (the one that BDC is pulling data from) is NOT configured with a SQL connection certificate, or is configured with a certificate that the SharePoint servers do not trust.
Cause
The March 2025 update included an update to the SQL Server connectivity libraries, as described in New database connectivity layer with TDS 8.0 and TLS 1.3 support. This includes the ability to create encrypted connections with SQL Server.
While the default encryption option for upgraded farms is “Optional”, that means it can still attempt to create an encrypted connection, even if the SQL Server has not been configured for encryption.
In this case, the SQL server sends a “SSL_Self_Signed_Fallback” self-signed certificate. Since the SharePoint servers have not been configured to trust that certificate, the connection fails.
The SQL component of this issue is documented here: Certificate validation failure.
Solution
This is fixed in the August 2025 Public Update for SPSE and newer builds of SharePoint Server Subscription Edition.
Workaround
If for some reason you cannot immediately update your SharePoint servers, you could workaround this issue by explicitly configuring a connection certificate for the SQL server that hosts the “external database” (the one that BDC is pulling data from, NOT the database used by the SharePoint BDC service application – although they may exist on the same SQL server).
1. Obtain a certificate for the SQL server.
This can come from a Certificate Authority (CA), or you can use PowerShell to create a self-signed certificate. For example, a certificate for a SQL server named “SQL.Contoso.Local”:
Note: The rest of the steps in this article assume you’re using self-signed certificate. You may have your own process for obtaining and trusting CA certificates.
# Create a self-signed SQL server cert, valid for 5 years
$date = Get-Date
$certPath = "c:\certs\SQLServer.PFX"
$certPassword = ConvertTo-SecureString -String YourCertPasswordHere -Force -AsPlainText
$cert = New-SelfSignedCertificate -CertStoreLocation Cert:\LocalMachine\My -Subject 'SQL.contoso.local' -NotAfter ($date.AddYears(5)) -KeySpec KeyExchange -DnsName 'sql.contoso.local', 'sql'
Export-PfxCertificate -Cert $cert -FilePath $certPath -Password $certPassword
2. Trust the certificate on the SQL server
Browse to the certificate path, for example: “c:\certs\SQLServer.PFX”. Right-click on the PFX file and choose to “Install PFX”. Choose “Local Machine” | Next | Supply the cert password | Next | Choose “Place all certificates in the following store”, and hit the “Browse” button. Choose “Trusted Root Certification Authorities” | Next | Finish.
Note: If you’re using a proper certificate from a CA, it likely has a parent certificate or two. The SQL server must trust ALL certificates in the chain.
3. Make sure the SQL Server service account has permission to the certificate private key.
- On the SQL server, open SQL Server Configuration Manager and choose “SQL Server Services”.
- Check the “Log On As” column for the “SQL Server” service. It may be a domain account, or a built-in account like “NT Service\MSSQLSERVER”. That is the account that needs permission to the certificate private key.

- On the SQL server, open the Run command and type “certlm.msc” to open the local machine certificate manager.
- Go to Personal | Certificates.
- Find the SQL certificate you just installed and Right-click | All Tasks | Manage Private Keys.
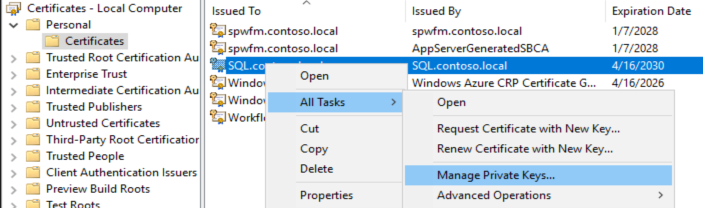
- Add the account there that you found is running the “SQL Server” service, for example: “NT Service\MSSQLSERVER”, or “contoso\SqlServiceAcct”.
4. Apply the SQL server certificate
- Open SQL Server Configuration Manager, expand “SQL Server Network Configuration”, right-click on “Protocols for MSSQLSERVER”, and choose “Properties”.
- On the “Certificate” tab, click the “Import” button to import your certificate.
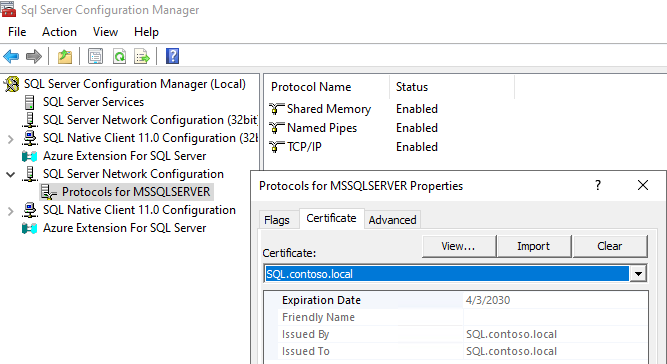
Note: You do NOT need to “Force Encryption” or “Force Strict Encryption” on the “Flags” tab. Just assigning a cert should suffice for this issue.
5. Restart the SQL Service
After the certificate is applied, the SQL service must be restarted before it is used.
- On the SQL server, open “SQL Server Configuration Manager” and choose “SQL Server Services”.
- Select the “SQL Server” service and choose “Restart”.
Note: This will cause a brief interruption in the applications using the SQL server, so you may want to complete this step during scheduled downtime.
6. Trust the SQL certificate on the SharePoint Servers
After it’s been imported within SQL Server Configuration Manager, click the “View” tab to view the certificate. Click the “Details” tab, then the “Copy to File” button. Use the wizard to export the certificate WITHOUT the private key to a “DER encoded binary x.509 (.CER)” file.
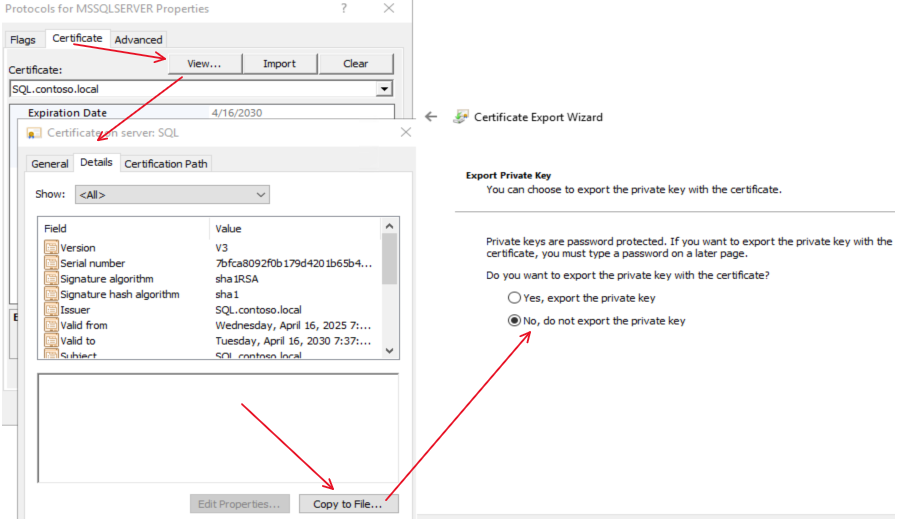
Copy that .cer file to all SharePoint servers in the farm and import it to the “Trusted Root Certification Authorities” store.
Note: If you’re using a proper certificate from a CA, it likely has a parent certificate or two. The SharePoint servers must trust ALL certificates in the chain.
7. Test
Browse back to the external list or whatever BDC application was broken. It should work now.